Check out my first novel, midnight's simulacra!
Dankdryer improvements
In an earlier article, I designed and constructed a high-temperature filament dryer. Before I was even done putting together the first design, I was thinking of improvements for reliability, efficiency, cost, and ease of assembly. I've put some of them into effect, and the results are most pleasing.
Models
- Rather than mounting the RC522 directly onto the bottom of the top chamber, we print a short mount for it (building the mount into the hotbox would make it very difficult to print). This reduces the heat directly transferred to the RC522, without adding new connectors. The necessary screw holes into the bottom of the chamber already exist.
- I changed the motor mount from a rectangular to a trapezoidal prism, and then cut an inverted trapezoidal prism out from its center, reducing material costs for the cool chamber. I raised the air shield to cover the entirety of the load cell.
- I moved from a worm drive to a more efficient hypoid gear. This reduced the choppiness of the platter rotation.
- I experimented with adding a kinda inverted eggholder (actually just a bunch of inverted frustra) to the underside of the bottom chamber, in the hope of eliminating warping. It didn't really pan out (a good number detached from the build plate), and you need defeat warping for the top chamber anyway, so I removed them.
- I cut out chunks from the eight "fat corners" of the hotbox. I'd like to make these siting areas for dessicants.
Electronics
- Let's toss the TB6612FNG motor controller. We only need one direction of rotation, so we control the motor with an RFP30N06LE N-channel MOSFET, a 1N5817 Schottky diode, and a 10K resistor. The n-FET goes on the ground side of the motor, and the diode runs in parallel with the load (i.e. is connected to the motor's two pins). The resistor pulls down the gate lead. This eliminates four net (AIN1, AIN2, STBY, AO2, APWM go away; we add GATE) wires while adding one resistor, a net reduction of seven joints. I'm not certain that it's actually any cheaper, though; it might actually be more expensive.
- It's not easy finding a good throughhole logic level MOSFET for 3.3v (surface mount are readily available)! The RFP30N06LE will only pass about 20% of its rated amperage at 3.3v...but that's more than enough for our needs (the TB6612FNG could only sustain 1.2A, after all). I already had the necessary MOSFET thanks to this cute little set.
- The LM35 is operating in a nasty thermal environment, and on about ten centimeters of poorly-shielded AWG22. Let's give it some bigger boxing gloves. Put a 0.1µF bypass capacitor across its power and ground leads. Put a 75Ω resistor and a 0.22µF capacitor in series between the signal and the wire. These recommendations come directly from the datasheet:
PCB considerations
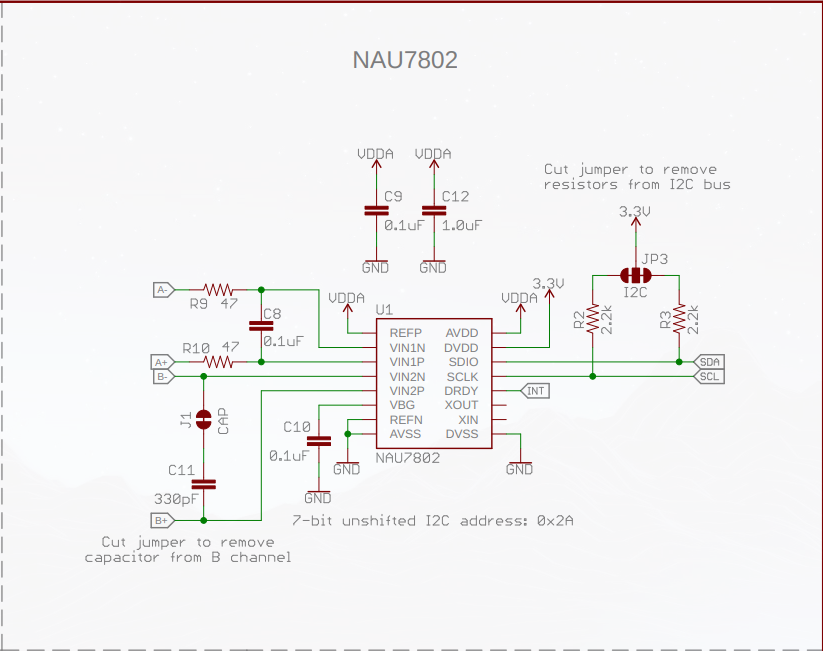
- We're ditching the Sparkfun NAU7802 breakout board, so we'll need add 2.2kΩ pullups on both I2C lines, 0.1µF and 1µF capacitors on VDDA, and 47Ω resistors on VNN1N and VNN1P with a 0.1µF bypass capacitor across them. See the schematic:

