Check out my first novel, midnight's simulacra!
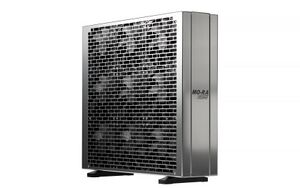
MO-RA

The MO-RA3 family of external radiators is a product of Germany's Watercool. It is available in 360mm and 420mm models. The former natively supports nine 120mm fans; the latter natively supports nine 140mm fans (18 on the Pro, which supports fans mounted on both front and back). At a mere 9 fins per inch, it does not require high-pressure fans to maximize performance, relying instead on sheer size.
Other large external radiators include the Alphacool NexXxoS and the Phobya G-Changer Xtreme NOVA.
The radiator has no power-consuming elements itself. It provides 6 G¼ ports, of which 4 come plugged. There are three on the bottom, and three on the top.
| Model | Weight empty (kg) | Dimensions (mm) | Capacity (mL) | Pipe rows | Cu (m) |
|---|---|---|---|---|---|
| 360 | 6.5 | 415x383x65 | 1100 | 72 | 28 |
| 420 | 7.7 | 475.5x430x65 | 1400 | 80 | 36 |
Power

An Arctic P-14 PWM PST RGB 140mm fan requires a maximum of 0.17A for the fan and 0.20A for the LEDs (all at 12V, so 2.04W and 2.4W respectively, 4.44W total). They provide daisy chaining:
| P-14 RGBs | Fan watts | LED watts | Total |
|---|---|---|---|
| 3 | 6.12 | 7.2 | 13.32 |
| 6 | 12.24 | 14.4 | 16.64 |
| 9 | 18.36 | 21.6 | 39.96 |
| 18 | 36.72 | 43.2 | 79.92 |
The ARGB version claims 0.4A for the 5V ARGB LEDS (2.04W and 2W respectively, 4.04W total, about 91% of the RGB variant).
| P-14 ARGBs | Fan watts | LED watts | Total |
|---|---|---|---|
| 3 | 6.12 | 6 | 12.12 |
| 6 | 12.24 | 12 | 24.24 |
| 9 | 18.36 | 18 | 36.36 |
| 18 | 36.72 | 36 | 72.72 |
The Noctua NF-A14 is 0.13A (fan only), 1.56W. There is no daisy chaining.
| NF-A14s | Fan watts |
|---|---|
| 3 | 4.68 |
| 6 | 9.36 |
| 9 | 14.04 |
| 18 | 28.08 |
Pairing 9x P-14s on the front with 9x NF-A14s on the back yields a maximum 54W of 12V power draw, exactly 4.5A. Coincidentally, this is the exact amount of 12V power provided by the 3 1.5A 12V pins of a SATA power connector.
It would be possible to locally provide power via a 12V AC adapter. 12V/5A adapters can be easily acquired, and would be sufficient to deliver the necessary 54W (5A at 12V is 60W). But such an adapter is likely to be significantly less efficient than a high-grade PSU. In my workstation, I've got an EVGA Supernova T2 Titanium power supply, which will be far more efficient than any dinky AC adapter.
Wiring
Desiring to source the most efficient power possible, I'll run a lengthy PCIe 6-pin cable out the back of my machine, capable of carrying at least 75W on its three 12V pins (6.24A). I'll then use a trivial adapter to take that to SATA or Molex, and thus be able to power nine PF-14s on the front, and nine NF-A14s on the back. I do not intend to put any pumps on the MO-RA3, as I already have three D5s in my workstation. My longest PCIe cables are 75cm long, with a 30cm PCIe-to-Molex adapter. This means I can't use the MO-RA3 more than about a meter away from my workstation. If I wanted to run it three meters away, I'd need to use external power (and cut longer tubes).
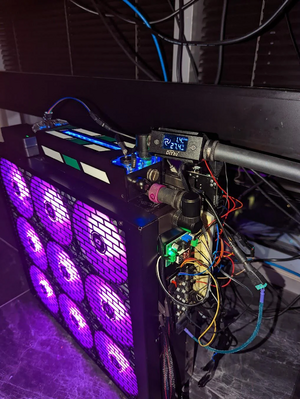
Actually, instead I just used a standard 12V AC adapter. A 120W supply can comfortably handle nine fans, two D5 pumps, an active sensor, and microcontrollers.
I'll need to run two tubes out to the MO-RA3, but beyond water and power, what is necessary? The RGB and PWM of fans must be managed. If I have any temperature or flow sensors on the MO-RA3, they'll need hookups. It ought be possible, however, to control all this from a device local to the MO-RA3. Many people use Aquacomputer products such as the Splitty in this role, and run data over a USB or Aquabus cable. I'd instead like to use a SBC with 2.4GHz 802.11n. I will likely break the shield off a CODI6 to get the PWM+RGB headers.
Dewire out of the Netherlands has some very nice linear PWM splitters, very suitable for use in the MO-RA3.
Daisy chaining
There are some subtleties here.
The Arctic P-14 blundered IMHO with its daisy chaining. For both DRGB and PWM, you have:
fan -> wire -> female -> wire -> male
but every PWM fan hookup ever made, and every DRGB hookup ever made, offers male and wants female (i.e. header *pins*). Admittedly, this is a weird departure from the norm (you typically want your charged elements to be female, so they don't go stabbing charge into hands, legs, metal, etc.), but it is what it is. This means that if you want to extrude the female receptacles (which you do), it's going to have a minimum of two wires showing (the wire to the fan, and the wire to the male). Furthermore, you don't get the full useful length of the wire.
This can be worked around by putting gender changers on the terminating fans' *male* connectors. Then, bring other fans' *male* connectors out, hooking up to the (unadapted) *female* receptacles in cascade, i.e.:
- fan1 -> wire -> female1 -> wire -> male1 plugs female2 -> wire -> male2 plugs gender adapter plugs source
- fan2 -> wire -> female2
- female1 is unused
the "gender adapter" here is just a 4-pin jumper.
But that's not how it's expecting to hook up; it expects you to use the female receptacles at the outlay. Thankfully, there's a little less than 25mm of gap on one side of the grill. So long as all your wires end up there, they'll be hidden (this gap has a solid cover). So...
- Each P-14 has an ARGB 4-pin hookup on one corner
- Looking at the front of the P-14, the 4-pin PWM hookup is on the next corner, clockwise
- The cables are 400mm
- The PWM connectors hook up more securely than the ARGB connectors do
So, looking at the front of the MO-RA3, arrange three fans along the bottom such that their ARGB corner is at the bottom right. Their PWM corners will be on the bottom left (if these are reversed, either the fan or the MO-RA3 is backwards). Bring all the cables all the way forward into the gap area (do *not* hook them up on the bottom edge; there's no room, and you're likely to mess up your ARGB connections). Hook them up female-to-male, with the rightmost fan's female receptacles free (and the leftmost fan's male connectors unused).
Now along the top, arrange three such that the ARGB corner is in the upper right. Repeat the process above. Three fans go in the middle. Once again, run the cables into the gap area, and connect them there. Tape everything down with electrical tape.
You ought now have six female headers in the gap area. Hook up a 3-way PWM splitter and a 3-way ARGB splitter. Run the two resulting females out through the hole in the grate, and hook them up to your source. Remember to watch your amperages!
Grills
The grills (sold separately) have a single small outlet for wires on one side. Flat wires can of course be run underneath the grill elsewhere on its perimeter.
External Links
- The MO-RA3 PC Radiator System from Titanrig, 2022-03-28
- MO-RA3 assembly guide